click the image to view larger
Saturday, January 28, 2012
Flippin' The Bird: Background
This the first finished background for 'Flippin' The Bird'. This is the opening pan, each layer of hedge or grass are separate so they will move past each other at different speeds as the camera pans giving depth.
Tuesday, January 24, 2012
Step By Step Tutorial: Digital Painting (sort of)
I use the term painting very loosely as a lot of the time I find myself using the eraser tool to draw with instead of the paint brush.
Ok so first off, I'm not a professional and I paint just for fun so this method my not be the 'correct' way to paint in photoshop, it's more like how I enjoy doing it. I do use other methods depending on what I'm painting. The one I'm about to show you, I like to use the most because it makes it easy to play around with lighting and you can get that nice vinyl toy look.
The two main things used in this method, that some people might not think to use so much, are the eraser tool and lots of different layer types. Layers are your friends, the more layers you have the more friends you have and who doesn't want lots of friends? Plus by using the correct layer type, you can let it can do half the work for you. If only my real friends did half the work for me too.
Workspace
The very first thing you should do when deciding to digitally paint in photoshop, is set your work space. I'll show you the workspace I use but always set it up what ever way you feel most comfortable with. (if you're aware of all this stuff then just skip down a bit)
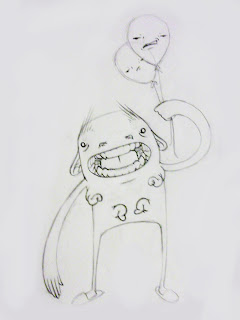 Step 1) you need an drawing to work from. I usually hand draw everything and scan it in but because my scanner/printer refuses to scan when there's no black ink (It doesn't make sense Epson!) I have to resort to taking a digital photo of my drawings and using that, the blacks and whites aren't as contrasted but it does the job for now. Often I duplicate the layer the drawing is on and edit the contrast anyway (for convenience sake I'm going to call this layer 'Layer_01' from now on). Make sure you change the duplicated drawing layer type to 'Multiply' and always keep it no the top of the layer stack. Then turn the visibility off the original drawing layer by clicking on the little 'eye' icon next to the layer.
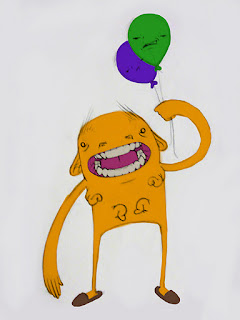 Step 2) Create a new layer ('Layer_02'), do this by clicking the 'new layer' icon (it looks like a little piece of paper with a corner folded) at the bottom right of the layer window next to the trash icon. Leave this new layer as 'Normal' for now and make sure it is beneath 'Layer_01'. Then select the brush tool and pick a brush. I would suggest, for this method, using one of the 'Hard Airbrush' brush's with the pressure sensitivity on if you have a graphic tablet that allows it. Then change the hardness of the brush to about 90%. For this layer its also a good idea to have the 'Opacity' and 'Flow' set to somewhere around 100% (I don't like to use exactly 100%) to change all the brush presets that I have mentioned, make sure you have the brush tool selected and all the presets are at the top left of the screen. Now select the colours you want and paint solid flat tones on the new layer. You will notice that 'layer_02' is visible even though it's beneath 'layer_01' in the stack., This is because 'layer_01' is set to 'Multiply'.
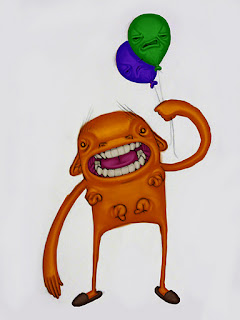 Step 3) When you have finished painting the solid tones, right click 'layer_02' and click 'Duplicate Layer' to make 'layer_03'. This new layer should appear between 'Layer_01' and 'Layer_02' and thats where you want it. Change 'Layer_03's type to 'Multiply' and you should notice all the colours have become darker. This is when the eraser tool comes in, select it and change all the presets to the same as I stated for the brush tool, except this time set the 'Opacity' and 'Flow' a lot lower, somewhere between 15% and 30% for both of them. Then start to slowly erase the parts of 'Layer_03' where you want the mid tones to be, leaving the parts that you haven't erased as the shadows (well really they're not shadows they fall somewhere in between shadows and mid tones). You can also get different lighting effects by changing the hue of 'Layer_03' go to Image > Adjustments > Hue Saturation.
 Step 4) Now create a new layer 'Layer_04' set this layer as multiply and put it above 'Layer_02' and 'Layer_03'. Then go back to the brush tool and select a mid range grey colour. Set the 'Opacity' and 'Flow' to around 20% again and start darkening up some of the shadows, this will give more form and pick out the details, so you might want to zoom in and use a small brush size. You can now turn 'Layer_01's visibility off. If the details still aren't clear with out the drawing layer, then turn it back on and add some more shading.
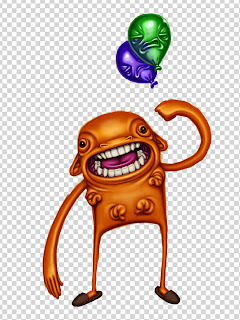 Step 5) As always create a new layer, 'Layer_05'. This will be the highlight layer. Put this layer above the rest of the layers and keep the type set to 'Normal'. Then with the brush tool (same presets as the shadows) add in a few highlights. I tend not to go straight for pure white, I usually select (with the eyedropper tool) the colour of the area I want the highlights to be. Then go to the colour window and click on the little colour square which should open another window. Select a pail version of the colour you have and use that as the highlights first. Sometimes, depending on the atmosphere I want to show in the picture, I will slightly add a tint of blue or yellow to the highlight but because you're using a new layer for the highlights you can edit the colour of them afterwards.
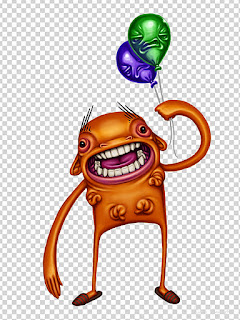 Step 6) Details and clean up. I usually use a lot of layers for this, it really depends on what you are drawing and if you want to add much more to it. Adding details like the weird eyebrows are straight forward. Open a new layer, put it on the top of the stack and keep it on 'Normal'. But for the more subtle details like the colour of his lip and around his eyes. I make a new layer, put it on top of the stack again but this time set it to 'Colour' (or 'Color' if you're american) Select a new colour, for example the pink I used, and start painting on the new 'Colour' Layer. This wont effect any of your dark tones or highlights but it will alter the hue of the layers below it.
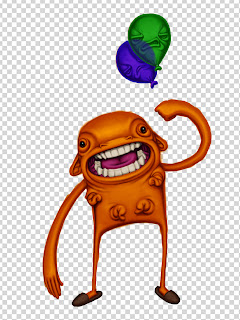
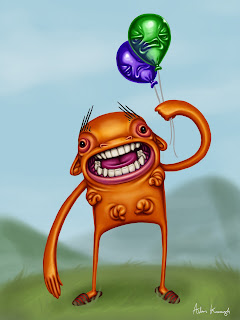 Step 7) Add a background, I personally like to keep my backgrounds simple when doing a piece like this but that is up to your personal style and preference. But once again use multiple layers.
Ok so first off, I'm not a professional and I paint just for fun so this method my not be the 'correct' way to paint in photoshop, it's more like how I enjoy doing it. I do use other methods depending on what I'm painting. The one I'm about to show you, I like to use the most because it makes it easy to play around with lighting and you can get that nice vinyl toy look.
The two main things used in this method, that some people might not think to use so much, are the eraser tool and lots of different layer types. Layers are your friends, the more layers you have the more friends you have and who doesn't want lots of friends? Plus by using the correct layer type, you can let it can do half the work for you. If only my real friends did half the work for me too.
Workspace
The very first thing you should do when deciding to digitally paint in photoshop, is set your work space. I'll show you the workspace I use but always set it up what ever way you feel most comfortable with. (if you're aware of all this stuff then just skip down a bit)
First open a new document and set the resolution to at least 300 (really you should set the DPI to 300 but I'm not so up on all that tech jazz). You can change the resolution by going to the top of the screen and click Image > Image size > Resolution.
Then set up your workspace. (I use PhotoShop CS4 by the way) If you look in the top right corner, it says 'Essentials' you can click on that and change to other preset workspaces but 'essentials' is the one I like to use. It might not look exactly like mine because I changed a few of the windows to suit me, such as the 'Navigator'. To change the windows, click 'window' at the top of the screen and choose from the drop down menu.
I just want to to quickly talk about 'Layer Types'. There plenty layer types, the main ones I use are: Normal, Multiply and Colour, but don't ignore the rest of them, experiment by changing layer types or use multiple different layer types on top of each other to see what effects you can achieve. To change the layer type, find the 'Layer' window somewhere on the right (if you're workspace is set to essentials) and click where it says 'Normal' to get a drop down menu of all the layer types.
Painting
Ok so now to start painting,
 Step 1) you need an drawing to work from. I usually hand draw everything and scan it in but because my scanner/printer refuses to scan when there's no black ink (It doesn't make sense Epson!) I have to resort to taking a digital photo of my drawings and using that, the blacks and whites aren't as contrasted but it does the job for now. Often I duplicate the layer the drawing is on and edit the contrast anyway (for convenience sake I'm going to call this layer 'Layer_01' from now on). Make sure you change the duplicated drawing layer type to 'Multiply' and always keep it no the top of the layer stack. Then turn the visibility off the original drawing layer by clicking on the little 'eye' icon next to the layer.
 Step 2) Create a new layer ('Layer_02'), do this by clicking the 'new layer' icon (it looks like a little piece of paper with a corner folded) at the bottom right of the layer window next to the trash icon. Leave this new layer as 'Normal' for now and make sure it is beneath 'Layer_01'. Then select the brush tool and pick a brush. I would suggest, for this method, using one of the 'Hard Airbrush' brush's with the pressure sensitivity on if you have a graphic tablet that allows it. Then change the hardness of the brush to about 90%. For this layer its also a good idea to have the 'Opacity' and 'Flow' set to somewhere around 100% (I don't like to use exactly 100%) to change all the brush presets that I have mentioned, make sure you have the brush tool selected and all the presets are at the top left of the screen. Now select the colours you want and paint solid flat tones on the new layer. You will notice that 'layer_02' is visible even though it's beneath 'layer_01' in the stack., This is because 'layer_01' is set to 'Multiply'.
 Step 3) When you have finished painting the solid tones, right click 'layer_02' and click 'Duplicate Layer' to make 'layer_03'. This new layer should appear between 'Layer_01' and 'Layer_02' and thats where you want it. Change 'Layer_03's type to 'Multiply' and you should notice all the colours have become darker. This is when the eraser tool comes in, select it and change all the presets to the same as I stated for the brush tool, except this time set the 'Opacity' and 'Flow' a lot lower, somewhere between 15% and 30% for both of them. Then start to slowly erase the parts of 'Layer_03' where you want the mid tones to be, leaving the parts that you haven't erased as the shadows (well really they're not shadows they fall somewhere in between shadows and mid tones). You can also get different lighting effects by changing the hue of 'Layer_03' go to Image > Adjustments > Hue Saturation.
 Step 4) Now create a new layer 'Layer_04' set this layer as multiply and put it above 'Layer_02' and 'Layer_03'. Then go back to the brush tool and select a mid range grey colour. Set the 'Opacity' and 'Flow' to around 20% again and start darkening up some of the shadows, this will give more form and pick out the details, so you might want to zoom in and use a small brush size. You can now turn 'Layer_01's visibility off. If the details still aren't clear with out the drawing layer, then turn it back on and add some more shading.
 Step 5) As always create a new layer, 'Layer_05'. This will be the highlight layer. Put this layer above the rest of the layers and keep the type set to 'Normal'. Then with the brush tool (same presets as the shadows) add in a few highlights. I tend not to go straight for pure white, I usually select (with the eyedropper tool) the colour of the area I want the highlights to be. Then go to the colour window and click on the little colour square which should open another window. Select a pail version of the colour you have and use that as the highlights first. Sometimes, depending on the atmosphere I want to show in the picture, I will slightly add a tint of blue or yellow to the highlight but because you're using a new layer for the highlights you can edit the colour of them afterwards.
 Step 6) Details and clean up. I usually use a lot of layers for this, it really depends on what you are drawing and if you want to add much more to it. Adding details like the weird eyebrows are straight forward. Open a new layer, put it on the top of the stack and keep it on 'Normal'. But for the more subtle details like the colour of his lip and around his eyes. I make a new layer, put it on top of the stack again but this time set it to 'Colour' (or 'Color' if you're american) Select a new colour, for example the pink I used, and start painting on the new 'Colour' Layer. This wont effect any of your dark tones or highlights but it will alter the hue of the layers below it.
  Step 7) Add a background, I personally like to keep my backgrounds simple when doing a piece like this but that is up to your personal style and preference. But once again use multiple layers.
That's about all I have to say, hopefully this helps somebody somewhere. I plan to try my hand some more traditional methods of digital painting, so when I get the hang of that, I will be sure to post another tutorial (sort of)
Thanks for reading this,
Adam
Sunday, January 22, 2012
Balloon Boy
I'll probably post a step by step on how I painted this if people are interested. There's a few ways I paint in photoshop, it mostly depends on what I'm painting.
Friday, January 13, 2012
Flippin' The Bird: Update
We are on the edge of starting production on 'Flippin' the Bird' just waiting for the go ahead from our tutor.
Here are some sample backgrounds.
Here are some sample backgrounds.
And we were advised to change the colours of the van to make it look more weighted. Hopefully these colours work. Also the graphic on the side of the van is being redesigned so thats still to go on.
Thursday, January 5, 2012
Subscribe to:
Comments (Atom)


